The introduction of high yielding varieties has resulted in increased demand for nutrients which cannot be achieved from the inherent soil fertility. Inputs such as fertilizer must be used to get optimum yields. The cost of such inputs is prohibitive while their rational use is imperative.
- There is need for soil testing and analysis to determine nutritional requirements for maximum productivity of a given crop.
- Many crop farmers neglect this important pre-farming activity which affects the total farm output.
- It is an essential tool in assessing soil fertility, suitable crops and fertilizer requirements. When done regularly, it also assesses the extent to which farm activities are affecting soil fertility.
- The potential for increased yields and profits has been the obvious motivator for the keen interest in soil testing.
- Fertilizer is the major cost driver in the production of most crops.
- The aim is to maximize marketable yields and not to harm the environment, which usually is a result of excessive use. Blind use of fertiliser can also lead to inefficiency and unnecessary production costs.
- A soil testing program is a valuable tool in determining efficient and economic crop production.
- Chemical soil analysis determines the content of basic plant nutrients; nitrogen, phosphorus (P2O5), potassium (K2 O), pH, humus content, total CaCO3, available lime, organic matter, total sulphur (S), trace elements, and other physical characteristics (capacity, permeability, density, pH – value)

WHY IS IT IMPORTANT?
- Soil testing is the best way to assess soil fertility. It helps you to make important farm decisions on what to grow and soil correctional measures required for maximum crop production. Soil testing is importing in the following key areas:
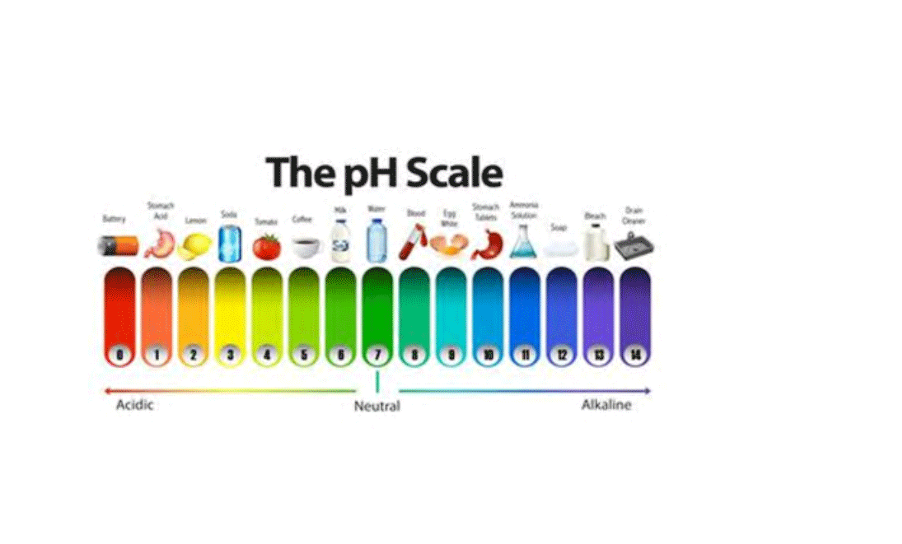
- Optimizes crop production. Soil testing allows for determining the macro and micro nutrient requirements of your crop. Applying too little fertilizer results in low yield whereas high yields can be obtained when adequate fertilizer is applied. Soil testing measures soil acidity and alkalinity usually known as soil pH.
- Reduces contamination by leaching of excess fertilizers.
- Reduces production costs by limiting fertilizer applied to only what is required by the plant
Helps in decision making.
WHAT IS SOIL pH?
- Soil pH can be viewed as an abbreviation for Power of concentration of Hydrogen ions in a solution.
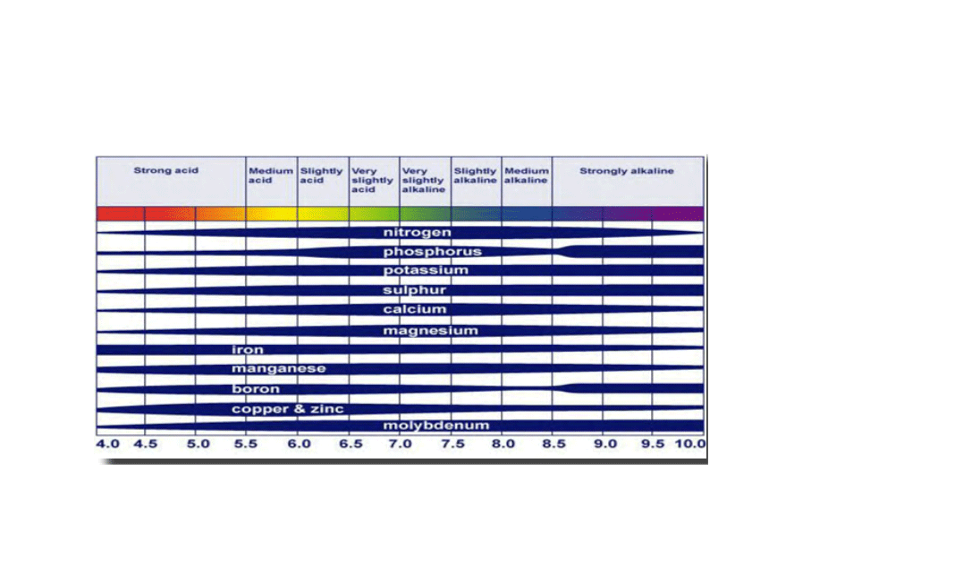
- The pH of a soil is a measure of hydrogen ion activity or concentration ([H+]) in the soil solution. As the H+ activity increases, soil pH decreases. As the soil pH decreases, most desirable crop nutrients become less available while others, often undesirable, become more available and can reach toxic levels.

WHAT ARE THE STEPS INVOLVED?
1. Soil sampling
2. Soil testing/ Analysis
3. Interpretation
4. Implementation

1. SOIL SAMPLING
Soil sample is the first and foremost component of soil testing that decides ultimate value of the service to the farmers. As a small amount of soil in the form of sample represents the entire delineated area, a poor soil sample becomes the primary source of error in soil testing and interpretation of results for nutrient recommendation or any other intended purposes. The following are points to consider when taking samples:

- Divide the land into similar areas depending on their colour of soil or past management practices with respect to liming, fertilizing or cropping.
- The best time for sampling is after the rains and when the soil has dried out e.g. April and May.
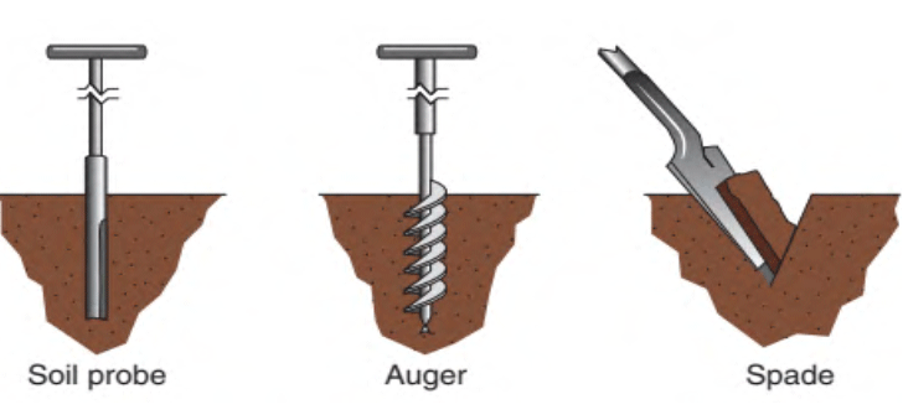
- A minimum of about twenty sub samples should be taken with a trowel for each demarcated area. Each sub-sample should be trowel full of soil to a brush of litter or loose soil on the surface.
- The sub-samples from the same area should be placed in a clean container free from contamination and thoroughly mixed.
- The resultant mixture should be spread on a clean sheet of paper, air dried and divided into 4 equal parts.
- Small portions of soil should be taken from each quarter until about 1-2kgs of soil has been obtained. This sample should be placed in a khaki bag or soil carton and not in plastic bag.
- The depth of sample for surface soils would be about 20cm or as deep as the primary tillage or specifically as deep as the root zone of intended crop.
- Each composite sample should be clearly labeled and if possible, the farmer should draw a sketch map of each land indicating from where the samples were taken.
- Unusual areas such as those in the vicinity of termite mounts, drains, wet spots and contour ridges must be avoided.
- The accuracy of soil analysis will depend on the thoroughness of the sampling technique.
- A complete history of land i.e. virgin land, fallow or riveted, density of cover and whether incorporated or burnt off, time of ploughing, past fertilizer history including liming must be submitted with each sample so that the soil testing laboratory can provide more reliable report.
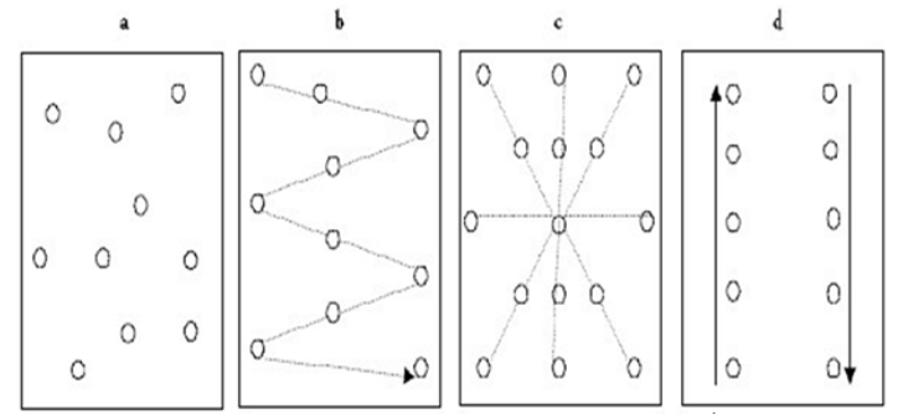
See diagram above showing various ways of soil sampling.
2. Soil testing/ analysis
- Soil testing is a time-tested tool for soil fertility evaluation and monitoring. It also helps restoration of depleted soils by offering soil-test based recommendations on plant nutrients and amendments. Soil testing operates on the principle of probability, meaning, if all other factors of productivity are at the optimum, there is high probability to obtain more profitable response to applied nutrients based on soil testing than to those applied on ad hoc basis. So far, the results have been impressive, provided the recommendations are formulated suiting the specific crops grown.
- After collecting your samples, you bring them to ZIMLABS laboratory where you fill in the attached form for submission together with your samples. It takes 4 working days to get results.
3. Interpretation
- After collecting results from a laboratory, the next step is interpretation. Interpretation shows you the corrective measures required for maximum productivity.
- This requires a qualified agronomist. Windmill is one of the companies offering interpretation services and also supplies lime and fertilizers as per your need. It usually takes 48hours to get the results.
4. Implementation
Follow given recommendations to get maximum results.
Avoid shortcuts and get the qualified people to help or guide you.
We hope that our recommendations will enable you to make your soil more productive while protecting the environment.
This article first appeared on Agribusiness Magazine. Like their Facebook Page for more tips


